Product Catalog
Tel 800.466.1940
Batch CAD Cart (0)
▾
Self-clinching microPEM® TackScrew™
microPEM® Fasteners
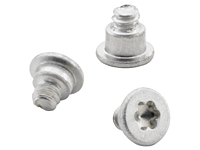
New self-clinching, threaded microPEM® TackScrew™ (Type TS™) fasteners enable cost effective sheet-to-sheet attachment, by simply pressing into place. The TackScrew™ fastener securely attaches a top sheet or panel to the base material. TackScrew fasteners can be removed by simply unscrewing similar to other threaded fasteners.
Features and Benefits
Features and Benefits
- Simple, press-in installation for secure attachment
- Proven clinch technology resists vibrational loosening.
- Replaces micro screws, eliminating installation issues including:
– Cost of locking patch
– Cost of threaded insert or tapped hole
– Cost of driver bits
– Cost of rework due to cross-threading and driver bit “cam-out” - Can be installed automatically for high volume application.
- Twists out (unscrew) if removal is necessary.Can be reinstalled one time using a thread locking adhesive.
- Laptops
- Notebooks
- Tablet Computers
- Cell/Smart Phones
- Gaming / Hand Held Devices
- Wearables
- Automotive Electronics
Unit of Measure
| Items |
 TS4-10-025 Type TS™ Self-clinching microPEM® TackScrew ™ |
 TS4-10-050 Type TS™ Self-clinching microPEM® TackScrew ™ |
||
| Fastener Material | N/A Heat-treated 400 Series Stainless Steel | |||
| Base Panel Hole Size Code | N/A 10 | |||
| Top Sheet Thickness Code | N/A 025 | N/A 050 | ||
| Top Sheet Thickness | N/A 0.2 to 0.28 mm.008 to .011 in | N/A 0.48 to 0.56 mm.019 to .022 in | ||
| Base Panel Min. Sheet Thickness1 | N/A 0.91 mm.036 in | |||
| Top Sheet Hole Size ±0.05mm/ ±.002in | N/A 1.47 mm.058 in | |||
| Base Panel Hole Size ±0.025mm/ ±.001in | N/A 0.99 mm.039 in | |||
|
A ± 0.05mm/±.002in |
N/A
0.406 mm.016 in
 |
N/A
0.686 mm.027 in
 |
||
| H ± 0.1mm/±.004in | N/A 2 mm.079 in | |||
| L ± 0.1mm/±.004in2 | N/A 0.64 mm.025 in | |||
| P ± 0.05mm/±.002in | N/A 1.3 mm.051 in | |||
| T ± 0.1mm/±.004in | N/A 0.25 mm.010 in | |||
| Min. Dist. Hole C/L to Edge3 | N/A 1 mm.039 in | |||
| Standard Finish | N/A Passivated and/or tested per ASTM A380 | |||
| For Use in Sheet Hardness |
N/A
HRB 89 or less (Hardness Rockwell “B” scale) HB 187 or less (Hardness Brinell) |
|||
| CAD Supplier | N/A PennEngineering® (PEM®) | |||
| Inventory | N/A {0} | N/A {0} | ||
|
||||