Product Catalog
Tel 800.466.1940
Batch CAD Cart (0)
▾
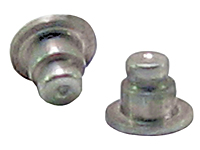
PEM Type TA™ Self-clinching microPEM® TackPin®
Sheet-to-Sheet Attachment
New self-clinching microPEM® TackPin® (Type T™) fasteners for compact electronic assemblies enable sheet-to-sheet attachment, replacing costly screw installation in applications where disassembly is not required. TackPin fastener use eliminates typical screw-related issues (including tapping, cross-threading, torque control, and vibration backout) and ultimately promotes quick and easy installation with minimal hardware. TackPin fasteners can provide a good alternative to welds or adhesives.
Features and Benefits
Features and Benefits
- Micro sized for fastening within very compact designs.
- Attaches top sheets as thin as 0.2 mm / .008 in.
- Clinches into base panels as hard as HRB 45 / HB 84.
- Interference fit minimizes hole tolerance issues.
- Tapered tip assists location.
- Low-profile head provides cosmetic benefits.
- Replaces screws: eliminating costly tapping, cross threading, torque control, vibration backout and installation time.
- Laptops
- Notebooks / Ultrabook™ Devices
- Tablet Computers
- Cell/Smart Phones
- Gaming / Hand Held Devices
- Ultrabook™ is a trademark of Intel Corporation
Unit of Measure
| Items |
 TA-10-025 TYPE TA™ microPEM® TackPin® Fasteners |
 TA-10-050 TYPE TA™ microPEM® TackPin® Fasteners |
 TA-10-075 TYPE TA™ microPEM® TackPin® Fasteners |
|||
| Fastener Material | N/A Aluminum | |||||
| Base Panel Hole Size Code | N/A 10 | |||||
| Top Sheet Thickness Code | N/A 025 | N/A 050 | N/A 075 | |||
| Top Sheet Thickness | N/A 0.2 to 0.28 mm.008 to .011 in | N/A 0.48 to 0.56 mm.019 to .022 in | N/A 0.71 to 0.79 mm.028 to .031 in | |||
| Base Panel Min. Sheet Thickness1 | N/A 0.89 mm.035 in | |||||
| Top Sheet Hole Size ± 0.05mm/± .002in | N/A 1.47 mm.058 in | |||||
| Base Panel Hole Size -0.05mm/ -.002in | N/A 1.02 mm.040 in | |||||
|
A ± 0.025mm/±.001in |
N/A
0.406 mm.016 in
|
N/A
0.686 mm.027 in
|
N/A
0.914 mm.036 in
|
|||
| B ± 0.075mm/±.003in | N/A 0.610 mm.024 in | |||||
| C Max. | N/A 0.89 mm.035 in | |||||
| H ± 0.10mm/±.004in | N/A 2 mm.079 in | |||||
| P ± 0.05mm/±.002in | N/A 1.3 mm.051 in | |||||
| T ± 0.10mm/±.004in | N/A 0.2 mm.008 in | |||||
| Min. Dist. Hole C/L to Edge2 | N/A 1 mm.039 in | |||||
| Standard Finish | N/A Plain | |||||
| For Use in Sheet Hardness |
N/A
HRB 45 or Less (Hardness Rockwell “B” Scale) HB 84 or Less (Hardness Brinell) |
|||||
| CAD Supplier | N/A PennEngineering® (PEM®) | |||||
| Inventory | N/A {0} | N/A {0} | N/A {0} | |||
|
||||||