Print Back
PEM® self-clinching studs are installed by placing them in properly sized holes in the sheets and squeezing into place with any standard press. The squeezing action embeds the head of the stud into the sheet. The metal displaced by the head flows smoothly and evenly around the ribs and into the annular groove - creating a flushhead assembly and securely locking the stud into the sheet with high torque-out and pushout resistances.

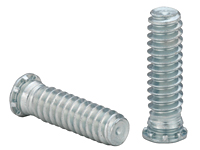
FHL (flush low-displacement head) Studs install closer to the edge of a sheet than PEM Types FH/FHS studs without causing that edge to bulge.
  • Installs closer to the edge of a sheet than PEM Type FH/FHS studs without causing that edge to bulge.
  • Flush-head for sheet thickness .040” and greater.
  • Type FHL is recommended for use in steel or aluminum sheets HRB (Rockwell “B” Scale) 80 or less and HB (Hardness Brinell) 150 or less.
  • Type FHLS is recommended for use in steel or aluminum sheets HRB (Rockwell “B” Scale) 70 or less and HB (Hardness Brinell) 125 or less.
Flush-head, low displacement studs - FHL, FHLS
Low-Displacement Head Studs - Types FHL, FHLS 2
Unit of Measure
Items Flush-head, low displacement studs - FHL, FHLS
FHL-256-4ZI
Low-Displacement Head Studs - Types FHL, FHLS - Unified
Flush-head, low displacement studs - FHL, FHLS
FHL-440-4ZI
Low-Displacement Head Studs - Types FHL, FHLS - Unified
Flush-head, low displacement studs - FHL, FHLS
FHL-632-4ZI
Low-Displacement Head Studs - Types FHL, FHLS - Unified
Flush-head, low displacement studs - FHL, FHLS
FHL-832-4ZI
Low-Displacement Head Studs - Types FHL, FHLS - Unified
Flush-head, low displacement studs - FHL, FHLS
FHL-256-5ZI
Low-Displacement Head Studs - Types FHL, FHLS - Unified
Thread Size N/A .086-56 (#2-56) N/A .112-40 (#4-40) N/A .138-32 (#6-32) N/A .164-32 (#8-32) N/A .086-56 (#2-56)
Thread Code N/A 256 N/A 440 N/A 632 N/A 832 N/A 256
Length Code N/A 4 N/A 4 N/A 4 N/A 4 N/A 5
Material Code N/A
Min. Sheet Thickness N/A .040 in
Hole Size in Sheet + .003 - .000 N/A .085 in N/A .111 in N/A .137 in N/A .163 in N/A .085 in
Max. Hole in Attached Parts N/A .100 in N/A .125 in N/A .150 in N/A .180 in N/A .100 in
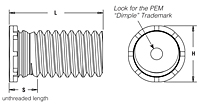
L - Length ± .0151 N/A .250 in a1376_1.jpg N/A .250 in a1376_1.jpg N/A .250 in a1376_1.jpg N/A .250 in a1376_1.jpg N/A .312 in a1376_1.jpg
H ± .015 N/A .112 in N/A .138 in N/A .164 in N/A .190 in N/A .112 in
S Max.2 N/A .080 in N/A .085 in N/A .090 in N/A .090 in N/A .080 in
Min. Dist. Hole C/L to Edge3 N/A .098 in N/A .124 in N/A .15 in N/A .176 in N/A .098 in
For Use in Sheet Hardness N/A HRB 80 / HB 150 or less
Thread Specification N/A External, ANSI B1.1, 2A
Fastener Material N/A Heat-Treated Carbon Steel
Standard Finish N/A Zinc plated per ASTM B633, SC1 (5µm), Type III, colorless
CAD Supplier N/A PennEngineering® (PEM®)
Inventory N/A {0} N/A {0} N/A {0} N/A {0} N/A {0}
  • 1 The “L” dimension is the height of the installed stud at max grip. The height of the stud will increase if it is installed into thinner material. To calculate “actual L” use this formula: max grip - actual grip + L = “actual L”
  • 2 Threads are gageable to within 2 pitches of the “S” Max. dimension. A class 3B/5H maximum material commercial nut shall pass up to the “S” Max. dimension.
  • 3 To minimize sheet distortion and maximize product performance, use a centerline-to-edge value greater or equal to the value specified.