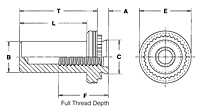
| Items |

B-440-1ZI
Self-Clinching Blind Fasteners - Types B, BS - Unified
|

B-632-1ZI
Self-Clinching Blind Fasteners - Types B, BS - Unified
|

B-832-1ZI
Self-Clinching Blind Fasteners - Types B, BS - Unified
|

B-032-1ZI
Self-Clinching Blind Fasteners - Types B, BS - Unified
|

B-0420-1ZI
Self-Clinching Blind Fasteners - Types B, BS - Unified
|
|
Thread Size
|
N/A
.112-40 (#4-40)
|
N/A
.138-32 (#6-32)
|
N/A
.164-32 (#8-32)
|
N/A
.190-32 (#10-32)
|
N/A
.250-20 (1/4-20)
|
|
Thread Code
|
N/A
440
|
N/A
632
|
N/A
832
|
N/A
032
|
N/A
0420
|
|
Shank Code1
|
N/A
1
|
|
A (Shank) Max.
|
N/A
0.038 in

|
N/A
0.038 in

|
N/A
0.038 in

|
N/A
0.038 in

|
N/A
.054 in

|
|
Min. Sheet Thickness
|
N/A
.040 in
|
N/A
.040 in
|
N/A
.040 in
|
N/A
.040 in
|
N/A
.056 in
|
|
Hole Size in Sheet + .003 - .000
|
N/A
.166 in
|
N/A
.188 in
|
N/A
.213 in
|
N/A
.250 in
|
N/A
.344 in
|
|
B Max.
|
N/A
.150 in
|
N/A
.169 in
|
N/A
.204 in
|
N/A
.235 in
|
N/A
.305 in
|
|
C Max.
|
N/A
.165 in
|
N/A
.187 in
|
N/A
.212 in
|
N/A
.249 in
|
N/A
.343 in
|
|
E ± .010
|
N/A
.250 in
|
N/A
.280 in
|
N/A
.310 in
|
N/A
.340 in
|
N/A
.430 in
|
|
F Min.
|
N/A
.210 in
|
N/A
.230 in
|
N/A
.280 in
|
N/A
.280 in
|
N/A
.310 in
|
|
L Max.2
|
N/A
.335 in
|
N/A
.335 in
|
N/A
.385 in
|
N/A
.385 in
|
N/A
.500 in
|
|
T ± .010
|
N/A
.380 in
|
N/A
.380 in
|
N/A
.440 in
|
N/A
.440 in
|
N/A
.560 in
|
|
Min. Dist. Hole C/L to Edge3
|
N/A
.19 in
|
N/A
.22 in
|
N/A
.27 in
|
N/A
.28 in
|
N/A
.34 in
|
|
For Use in Sheet Hardness4
|
N/A
HRB 80 / HB 150 or less
|
|
Thread Specification
|
N/A
Internal, ANSI B1.1, 2B
|
|
Fastener Material
|
N/A
Heat-Treated Carbon Steel
|
|
Standard Finish
|
N/A
Zinc plated per ASTM B633, SC1 (5µm), Type III, colorless
|
|
CAD Supplier
|
N/A
PennEngineering® (PEM®)
|
|
Inventory
|
N/A
{0}
|
N/A
{0}
|
N/A
{0}
|
N/A
{0}
|
N/A
{0}
|


