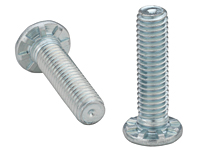
| Items |

HFE-032-8ZI
High-Strength Studs for Thin Sheets - Type HFE - Unified
|

HFE-0420-8ZI
High-Strength Studs for Thin Sheets - Type HFE - Unified
|

HFE-0518-8ZI
High-Strength Studs for Thin Sheets - Type HFE - Unified
|

HFE-032-12ZI
High-Strength Studs for Thin Sheets - Type HFE - Unified
|

HFE-0420-12ZI
High-Strength Studs for Thin Sheets - Type HFE - Unified
|
|
Thread Size
|
N/A
.190-32 (#10-32)
|
N/A
.250-20 (1/4-20)
|
N/A
.313-18 (5/16-18)
|
N/A
.190-32 (#10-32)
|
N/A
.250-20 (1/4-20)
|
|
Thread Code
|
N/A
032
|
N/A
0420
|
N/A
0518
|
N/A
032
|
N/A
0420
|
|
Length Code
|
N/A
8
|
N/A
8
|
N/A
8
|
N/A
12
|
N/A
12
|
|
Min. Sheet Thickness
|
N/A
.040 in
|
N/A
.040 in
|
N/A
.060 in
|
N/A
.040 in
|
N/A
.040 in
|
|
Hole Size in Sheet + .005 - .000
|
N/A
.190 in
|
N/A
.250 in
|
N/A
.312 in
|
N/A
.190 in
|
N/A
.250 in
|
|
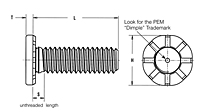
L - Length ± .0151
|
N/A
.500 in

|
N/A
.500 in

|
N/A
.500 in

|
N/A
.750 in

|
N/A
.750 in

|
|
H ± .01
|
N/A
.357 in
|
N/A
.462 in
|
N/A
.586 in
|
N/A
.357 in
|
N/A
.462 in
|
|
S Max.2
|
N/A
.102 in
|
N/A
.118 in
|
N/A
.133 in
|
N/A
.102 in
|
N/A
.118 in
|
|
T Max.
|
N/A
.048 in
|
N/A
.060 in
|
N/A
.083 in
|
N/A
.048 in
|
N/A
.060 in
|
|
Max. Hole in Attached Parts
|
N/A
.280 in
|
N/A
.340 in
|
N/A
.402 in
|
N/A
.280 in
|
N/A
.340 in
|
|
Min. Dist. Hole C/L to Edge3
|
N/A
.360 in
|
N/A
.470 in
|
N/A
.560 in
|
N/A
.360 in
|
N/A
.470 in
|
|
Thread Strength
|
N/A
120 ksi
|
|
For Use in Sheet Hardness
|
N/A
HRB 85 / HB 165 or Less
|
|
Thread Specification
|
N/A
External, ANSI B1.1, 2A
|
|
Fastener Material
|
N/A
Heat-Treated Carbon Steel
|
|
Standard Finish
|
N/A
Zinc plated per ASTM B633, SC1 (5µm), Type III, colorless
|
|
Optional Finish4
|
N/A
|
|
CAD Supplier
|
N/A
PennEngineering® (PEM®)
|
|
Inventory
|
N/A
{0}
|
N/A
{0}
|
N/A
{0}
|
N/A
{0}
|
N/A
{0}
|


