| Items |

SCBJ-M3-6ZI
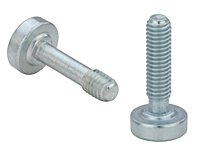
Captive Panel Screw-Tool only, Spinning Clinch Bolt, No Spring - Metric Type SCBJ
|

SCBJ-M3-10ZI
Captive Panel Screw-Tool only, Spinning Clinch Bolt, No Spring - Metric Type SCBJ
|

SCBJ-M3-12ZI
Captive Panel Screw-Tool only, Spinning Clinch Bolt, No Spring - Metric Type SCBJ
|

SCB-M3-12ZI
Captive Panel Screw-Tool only, Spinning Clinch Bolt, No Spring - Metric Type SCBJ
|

SCBJ-M4-6ZI
Captive Panel Screw-Tool only, Spinning Clinch Bolt, No Spring - Metric Type SCBJ
|
|
Thread Size x Pitch
|
N/A
M3 x 0.5
|
N/A
M3 x 0.5
|
N/A
M3 x 0.5
|
N/A
M3 x 0.5
|
N/A
M4 x 0.7
|
|
Type
|
N/A
Jacking - SCBJ
|
N/A
Jacking - SCBJ
|
N/A
Jacking - SCBJ
|
N/A
Non-Jacking - SCB
|
N/A
Jacking - SCBJ
|
|
Thread Code
|
N/A
M3
|
N/A
M3
|
N/A
M3
|
N/A
M3
|
N/A
M4
|
|
Screw Length Code
|
N/A
6
|
N/A
10
|
N/A
12
|
N/A
12
|
N/A
6
|
|
Min. Sheet Thickness
|
N/A
1.02 mm
|
|
Hole Size in Sheet + 0.08
|
N/A
3 mm
|
N/A
3 mm
|
N/A
3 mm
|
N/A
3 mm
|
N/A
4 mm
|
|
E ± 0.25
|
N/A
6.60 mm

|
N/A
6.60 mm

|
N/A
6.60 mm

|
N/A
6.60 mm

|
N/A
8.28 mm

|
|
H Nom.
|
N/A
2.03 mm
|
|
L - Length ± 0.41
|
N/A
6 mm
|
N/A
10 mm
|
N/A
12 mm
|
N/A
12 mm
|
N/A
6 mm
|
|
T Nom.
|
N/A
3.70 mm
|
N/A
7.70 mm
|
N/A
9.70 mm
|
N/A
3.30 mm
|
N/A
3.70 mm
|
|
Nom. Axial Float
|
N/A
|
N/A
|
N/A
|
N/A
7.67 mm
|
N/A
|
|
Driver Size
|
N/A
#1 Phillips
|
N/A
#1 Phillips
|
N/A
#1 Phillips
|
N/A
#1 Phillips
|
N/A
#2 Phillips
|
|
Min. Dist. Hole C/L to Edge2
|
N/A
3.3 mm
|
N/A
3.3 mm
|
N/A
3.3 mm
|
N/A
3.3 mm
|
N/A
5.00 mm
|
|
Thread Specification3
|
N/A
ANSI/ASME B1.13M, 6g
|
|
Material
|
N/A
Heat-Treated Carbon Steel
|
|
Finish
|
N/A
Zinc plated per ASTM B633, SC1 (5µm), Type III, colorless
|
|
Finish Spring
|
N/A
Natural Finish
|
|
For Use in Sheet Hardness
|
N/A
HRB 80 or Less (Hardness Rockwell “B” Scale) / HB 150 or Less (Hardness Brinell)
|
|
CAD Supplier
|
N/A
PennEngineering® (PEM®)
|
|
Inventory
|
N/A
{0}
|
N/A
{0}
|
N/A
{0}
|
N/A
{0}
|
N/A
{0}
|


