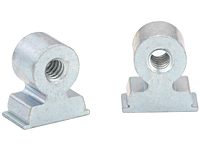
| Items |

RAS440-9-4ZI
Steel Threaded Right Angle Fastener - Type RAS - Unified
|

RAS440-9-6ZI
Steel Threaded Right Angle Fastener - Type RAS - Unified
|

RAS440-9-8ZI
Steel Threaded Right Angle Fastener - Type RAS - Unified
|

RAS632-10-4ZI
Steel Threaded Right Angle Fastener - Type RAS - Unified
|

RAS632-10-8ZI
Steel Threaded Right Angle Fastener - Type RAS - Unified
|
|
Thread Size
|
N/A
.112-40 (#4-40)
|
N/A
.112-40 (#4-40)
|
N/A
.112-40 (#4-40)
|
N/A
.138-32 (#6-32)
|
N/A
.138-32 (#6-32)
|
|
Type
|
N/A
RAS
|
|
Thread Code
|
N/A
440
|
N/A
440
|
N/A
440
|
N/A
632
|
N/A
632
|
|
Height Code
|
N/A
9
|
N/A
9
|
N/A
9
|
N/A
10
|
N/A
10
|
|
Length Code
|
N/A
4
|
N/A
6
|
N/A
8
|
N/A
4
|
N/A
8
|
|
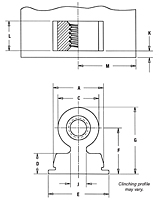
L - Length ± .0031
|
N/A
.121 in

|
N/A
.183 in

|
N/A
.246 in

|
N/A
.121 in

|
N/A
.246 in

|
|
Min. Sheet Thickness
|
N/A
.040 in
|
|
Hole Size in Sheet + 0.002 - 0.001
|
N/A
.312 x .125 in
|
N/A
.312 x .187 in
|
N/A
.312 x .250 in
|
N/A
.375 x .125 in
|
N/A
.375 x .250 in
|
|
A ± .003
|
N/A
.308 in
|
N/A
.308 in
|
N/A
.308 in
|
N/A
.371 in
|
N/A
.371 in
|
|
C Nom.
|
N/A
.250 in
|
N/A
.250 in
|
N/A
.250 in
|
N/A
.300 in
|
N/A
.300 in
|
|
D Nom.
|
N/A
.125 in
|
|
E ± .006
|
N/A
.370 in
|
N/A
.370 in
|
N/A
.370 in
|
N/A
.433 in
|
N/A
.433 in
|
|
F - Height ± .006
|
N/A
.281 in
|
N/A
.281 in
|
N/A
.281 in
|
N/A
.312 in
|
N/A
.312 in
|
|
G Nom.
|
N/A
.406 in
|
N/A
.406 in
|
N/A
.406 in
|
N/A
.462 in
|
N/A
.462 in
|
|
J Nom.
|
N/A
.096 in
|
N/A
.096 in
|
N/A
.096 in
|
N/A
.141 in
|
N/A
.141 in
|
|
Min. Part Face to Edge K
|
N/A
.040 in
|
|
Min. Dist. Hole C/L to Edge M2
|
N/A
.300 in
|
N/A
.350 in
|
N/A
.430 in
|
N/A
.350 in
|
N/A
.500 in
|
|
Thread Specification
|
N/A
2B per ASME B1.1
|
|
Standard Material
|
N/A
Steel
|
|
Standard Finish
|
N/A
Zinc plated per ASTM B633, SC1 (5µm), Type III, colorless
|
|
For Use in Sheet Hardness
|
N/A
HRB 60 (Hardness Rockwell “B” Scale) / HB (Hardness Brinell) 107 or Less
|
|
CAD Supplier
|
N/A
PennEngineering® (PEM®)
|
|
Inventory
|
N/A
{0}
|
N/A
{0}
|
N/A
{0}
|
N/A
{0}
|
N/A
{0}
|


